2. Now Create a new notice and enter the consent text. For example:
<h3>We use cookies</h3>
We use cookies and other tracking technologies to improve your browsing experience on our website, to show you personalized content and targeted ads, to analyze our website traffic, and to understand where our visitors are coming from.

<div class="consent-btns">
<button class="xnotice-dissent" onclick="consentClose()">I do not accept</button><button class="xnotice-close">I accept</button>
</div>
3. Under the `Notice Setting tab, Select the `Display Type to `Sticky`
4. Tick the checkbox `Don’t show once closed`
5. Pick the `Token Storage Type to `Cookie`
6. On the Custom Layout Field, enter following custom layout
<div {attr} class="cookie-consent">{notice}</div>
7. On the `Custom Javascript` field, enter following:
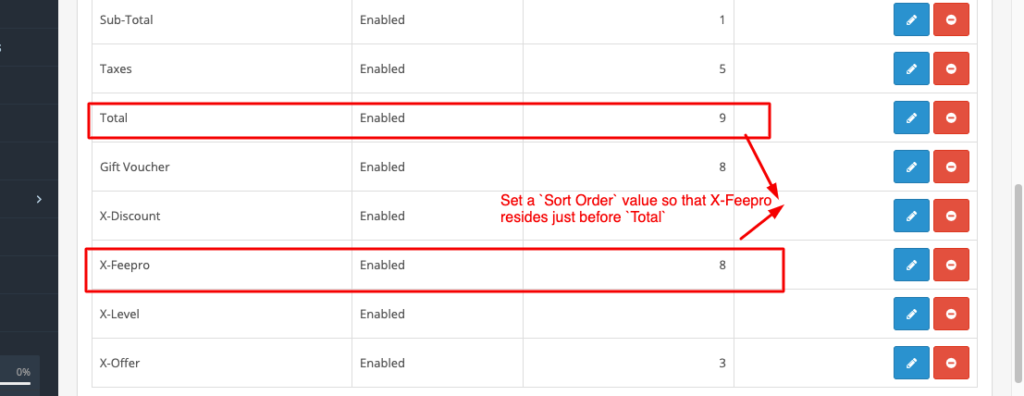
Both are independent modules and has a different purpose. X-Fee/Discount Pro is an `Order total` module that deals with shopping cart products and their values like cart weight, cart quantity, etc. This fee/discount will appear on the `Order Total Section`. You can create a discount/fee based on the various parameters with it. For example, Payment processing fee, any surcharge, etc. Also, you can create Order discounts based on the various cart parameters.
On the contrary, `X-Discount/Special Price` is intended to creating a product special price and quantity discount. It works exactly the same as the OC default Special Price and Quantity discount but it gives an option to control special price and qty disocunt from a single place in a convenient way.
In a nutshell, X-Feepro is intended to create an Order Discount/Fee and X-Discount is intended to create a Product discount.
To sum up the cost of several methods, you can use the Grouping Option. Here are the steps to be followed:
Go to X-Shippingpro -> Global setting -> Grouping, Now select a group e.g. Group1 to SUM
2. Now we have a group1 and we have to assign group method/member for this group.
3. To assign a method into a group, go to the general tab of a method, select the Group to Group1.
4. When X-Shippingpro finds several methods belongs to the same group during checkout, X-Shippingpro takes the appropriate action and shows one method instead of showing them all.
For example, you have a `Method-1` and `Method-2` methods. If customer want to purchase only from the `Method-2` or `Method-2`, group mode will not come into action.
But when a customer wants to purchase from both `Method-1` and `Method-2`, it meets the group criteria and grouping will come into action. So shipping cost will be summed up and it displays the summed cost instead of showing separately.
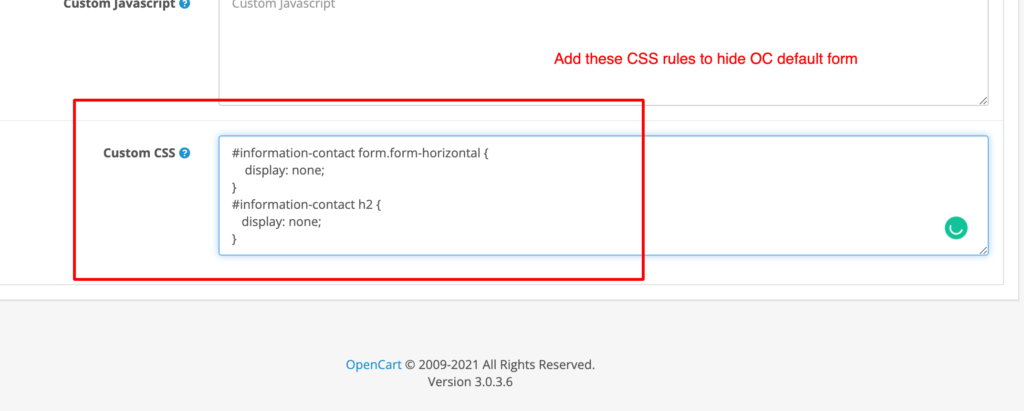
To integrate the custom verification popup, first copy the Layout html and paste in the field Custom layout and copy the Required CSS and paste in the field Custom CSS
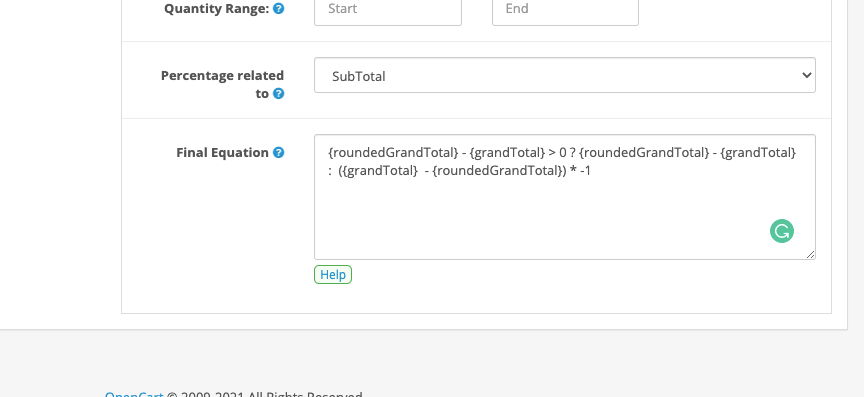
(P.S: if you find any problem, please replace the dash with a minus sign in the equation as HTML replaces the minus sign to a dash that may cause a problem)
Example 1: Buy two and get one free to specific Categories
Create a new combination
In the Product Combination tab, click the Add Category button and choose the applicable categories
Enter The number of purchases required of a product to 2
That’s all.
Attention
The number of purchases required of a product represents the minimum quantity of a single product that is required to purchase to avail offer. For example, if you enter The number of purchases required of a product to 2, that indicates the minimum quantity of a particular product is 2. It does NOT mean any two items out of any products of the given categories. Please check example 2 that is different than example 1 .
Example 2: Buy ANY two from category A and get one free
Create a new combination
In the Product Combination tab, click the Add Category button and choose category A and Enter The number of purchases required of a product to 1
In the Product Combination tab, click the Add Category button and choose category A and Enter The number of purchases required of a product to 1
Under the Offer Products tab, Enter Number of offer products to 1
Under the Offer Products tab, define the offers products you want to pick out one of them. To add Offer products, simply click the button Add offer products and choose the applicable products.
That’s all.
Note: Please check the step 2 and 3, I have added the same steps twice that indicate one item of any product of Category A and another item of any products of category A as well. So it will give the freedom to customers to pick any two items from any number of products of category A.
Example 3: Buy two from category A or B and get one free
Create a new combination
In the Product Combination tab, click the Add Category button and choose category A, B and Enter The number of purchases required of a product to 2
Under the Offer Products tab, enter Number of offer products to 1
Under the Offer Products tab, define the offers products you want to pick out one of them. To add Offer products, simply click the button Add offer products , and choose the applicable products.
That’s all.
Note: This indicates the offer is valid to the products of category A and B. The minimum purchase required of each product is 2.
Example 4: Buy ANY two from category A or B and get one free
Create a new combination
In the Product Combination tab, click the Add Category button and choose category A, B and Enter The number of purchases required of a product to 1
In the Product Combination tab, click the Add Category button and choose category A, B and Enter The number of purchases required of a product to 1
Under the Offer Products tab, enter Number of offer products to 1
Under the Offer Products tab, define the offers products you want to pick out one of them. To add Offer products, simply click the button Add offer products , and choose the applicable products.
That’s all. [Similar to example 2]
Example 5: Buy one from category A and two from category B and get one discounted products.
Create a new combination
In the Product Combination tab, click the Add Categorybutton and choose category A and Enter The number of purchases required of a product to 1
In the Product Combination tab, click the Add Category button and choose category B and Enter The number of purchases required of a product to 2
Under the Offer Products tab, enter Number of offer products to 1
Under the Offer Products tab, define the offers products you want to pick out one of them. To add Offer products, simply click the button Add offer products , and choose. Finally, adjust the discount amount you want to offer.
Example 6: Buy two and get 50% discount of one product to specific Categories
Create a new combination
In the Product Combination tab, click the Add Category button and choose the applicable categories
Enter The number of purchases required of a product to 2
Under the Offer Products tab, Enter discount amount to 50%
That’s all.
Example 7: Buy One and get two free to specific Categories
Create a new combination
In the Product Combination tab, click the Add Category button and choose the applicable categories
Enter The number of purchases required of a product to 1
Under the Offer Products tab, enter Number of offer products to 2
That’s all.
Example 8: Buy two from category A and pick a gift products from X, Y and Z
Create a new combination
In the Product Combination tab, click the Add Category button and choose the category A
Enter The number of purchases required of a product to 2
Under the Offer Productstab, enter Number of offer products to 1
Under the Offer Products tab, pick Select offer products type to Define offer products.
Then click theAdd offer Products button and choose the products X, Y, and Z.
Finally, you can adjust the discount amount in percentage or a flat amount for each offered product.
That’s all.
Example 9: Buy One from category A and One from Brand B and pick a gift product from X, Y, and Z
Create a new combination
In the Product Combination tab, click the Add Category button and choose the category A and Enter The number of purchases required of a productto 2
In the Product Combination tab, click the Add Manufacturer button and choose the manufacturer B and Enter The number of purchases required of a productto 2
Under the Offer Products tab, enter Number of offer products to 1
Under the Offer Products tab, pick Select offer products type to Define offer products.
Then click the Add offer Products button and choose the products X, Y, and Z.
Finally, you can adjust the discount amount in percentage or a flat amount for each offered product.
That’s all.
Example 10: Buy two of a product regardless of the options, get one free.
Create a new combination
In the Product Combination tab, click the Add Product button and choose the applicable Products and Enter The number of purchases required of a productto 1
In the Product Combination tab, click the AddProduct button and choose the same products you’ve chosen above and Enter The number of purchases required of a productto 1
Under the Offer Products tab, enter Number of offer products to 1
Under the Offer Products tab, pick Select offer products type to Same as the purchased products.
That’s all.
Example 11: Buy two Large Pizza, get one Small pizza free.
Note: Large and Small represent the OC options
Create a new combination
In the Product Combination tab, click the Add Category button and choose the category Pizza and Enter The number of purchases required of a productto 1
In the Product Combination tab, click the Add Category button and choose the category Pizza and Enter The number of purchases required of a productto 1
In the Product Combination tab, click the Add Option button and choose the options Large and Enter The number of purchases required of a productto 0
Under the Offer Products tab, enter Number of offer products to 1
Under the Offer Products tab, pick the Select offer products type to Same as the purchased products.
Under the the Offer Products tab, select the Discount on option price to Discount on some option price. Then choose the option Small
Note: Step 2 and Step 3 ensures the number of purchase required is two and it could be any two items from the category Pizza. The step-3 will make sure that the product must have the option `Large. We don't need to provide any quantity here. The module automatically would make sure the corresponding options were chosen if it sees the quantity for the option rule as 0.
7. On the Payment success condition field, enter the following condition:
LMI_PAYMENT_NO != ''
Complete Integration example of webmoney in X-payment
8. Please download this ocmod and install it through the extension installer and refresh your ocmod list. This is needed as WebMoney does not return to the success page properly.