2. Now Create a new notice and enter the consent text. For example:
<h3>We use cookies</h3>
We use cookies and other tracking technologies to improve your browsing experience on our website, to show you personalized content and targeted ads, to analyze our website traffic, and to understand where our visitors are coming from.

<div class="consent-btns">
<button class="xnotice-dissent" onclick="consentClose()">I do not accept</button><button class="xnotice-close">I accept</button>
</div>
3. Under the `Notice Setting tab, Select the `Display Type to `Sticky`
4. Tick the checkbox `Don’t show once closed`
5. Pick the `Token Storage Type to `Cookie`
6. On the Custom Layout Field, enter following custom layout
<div {attr} class="cookie-consent">{notice}</div>
7. On the `Custom Javascript` field, enter following:
To sum up the cost of several methods, you can use the Grouping Option. Here are the steps to be followed:
Go to X-Shippingpro -> Global setting -> Grouping, Now select a group e.g. Group1 to SUM
2. Now we have a group1 and we have to assign group method/member for this group.
3. To assign a method into a group, go to the general tab of a method, select the Group to Group1.
4. When X-Shippingpro finds several methods belongs to the same group during checkout, X-Shippingpro takes the appropriate action and shows one method instead of showing them all.
For example, you have a `Method-1` and `Method-2` methods. If customer want to purchase only from the `Method-2` or `Method-2`, group mode will not come into action.
But when a customer wants to purchase from both `Method-1` and `Method-2`, it meets the group criteria and grouping will come into action. So shipping cost will be summed up and it displays the summed cost instead of showing separately.
Example 1: Buy two and get one free to specific Categories
Create a new combination
In the Product Combination tab, click the Add Category button and choose the applicable categories
Enter The number of purchases required of a product to 2
That’s all.
Attention
The number of purchases required of a product represents the minimum quantity of a single product that is required to purchase to avail offer. For example, if you enter The number of purchases required of a product to 2, that indicates the minimum quantity of a particular product is 2. It does NOT mean any two items out of any products of the given categories. Please check example 2 that is different than example 1 .
Example 2: Buy ANY two from category A and get one free
Create a new combination
In the Product Combination tab, click the Add Category button and choose category A and Enter The number of purchases required of a product to 1
In the Product Combination tab, click the Add Category button and choose category A and Enter The number of purchases required of a product to 1
Under the Offer Products tab, Enter Number of offer products to 1
Under the Offer Products tab, define the offers products you want to pick out one of them. To add Offer products, simply click the button Add offer products and choose the applicable products.
That’s all.
Note: Please check the step 2 and 3, I have added the same steps twice that indicate one item of any product of Category A and another item of any products of category A as well. So it will give the freedom to customers to pick any two items from any number of products of category A.
Example 3: Buy two from category A or B and get one free
Create a new combination
In the Product Combination tab, click the Add Category button and choose category A, B and Enter The number of purchases required of a product to 2
Under the Offer Products tab, enter Number of offer products to 1
Under the Offer Products tab, define the offers products you want to pick out one of them. To add Offer products, simply click the button Add offer products , and choose the applicable products.
That’s all.
Note: This indicates the offer is valid to the products of category A and B. The minimum purchase required of each product is 2.
Example 4: Buy ANY two from category A or B and get one free
Create a new combination
In the Product Combination tab, click the Add Category button and choose category A, B and Enter The number of purchases required of a product to 1
In the Product Combination tab, click the Add Category button and choose category A, B and Enter The number of purchases required of a product to 1
Under the Offer Products tab, enter Number of offer products to 1
Under the Offer Products tab, define the offers products you want to pick out one of them. To add Offer products, simply click the button Add offer products , and choose the applicable products.
That’s all. [Similar to example 2]
Example 5: Buy one from category A and two from category B and get one discounted products.
Create a new combination
In the Product Combination tab, click the Add Categorybutton and choose category A and Enter The number of purchases required of a product to 1
In the Product Combination tab, click the Add Category button and choose category B and Enter The number of purchases required of a product to 2
Under the Offer Products tab, enter Number of offer products to 1
Under the Offer Products tab, define the offers products you want to pick out one of them. To add Offer products, simply click the button Add offer products , and choose. Finally, adjust the discount amount you want to offer.
Example 6: Buy two and get 50% discount of one product to specific Categories
Create a new combination
In the Product Combination tab, click the Add Category button and choose the applicable categories
Enter The number of purchases required of a product to 2
Under the Offer Products tab, Enter discount amount to 50%
That’s all.
Example 7: Buy One and get two free to specific Categories
Create a new combination
In the Product Combination tab, click the Add Category button and choose the applicable categories
Enter The number of purchases required of a product to 1
Under the Offer Products tab, enter Number of offer products to 2
That’s all.
Example 8: Buy two from category A and pick a gift products from X, Y and Z
Create a new combination
In the Product Combination tab, click the Add Category button and choose the category A
Enter The number of purchases required of a product to 2
Under the Offer Productstab, enter Number of offer products to 1
Under the Offer Products tab, pick Select offer products type to Define offer products.
Then click theAdd offer Products button and choose the products X, Y, and Z.
Finally, you can adjust the discount amount in percentage or a flat amount for each offered product.
That’s all.
Example 9: Buy One from category A and One from Brand B and pick a gift product from X, Y, and Z
Create a new combination
In the Product Combination tab, click the Add Category button and choose the category A and Enter The number of purchases required of a productto 2
In the Product Combination tab, click the Add Manufacturer button and choose the manufacturer B and Enter The number of purchases required of a productto 2
Under the Offer Products tab, enter Number of offer products to 1
Under the Offer Products tab, pick Select offer products type to Define offer products.
Then click the Add offer Products button and choose the products X, Y, and Z.
Finally, you can adjust the discount amount in percentage or a flat amount for each offered product.
That’s all.
Example 10: Buy two of a product regardless of the options, get one free.
Create a new combination
In the Product Combination tab, click the Add Product button and choose the applicable Products and Enter The number of purchases required of a productto 1
In the Product Combination tab, click the AddProduct button and choose the same products you’ve chosen above and Enter The number of purchases required of a productto 1
Under the Offer Products tab, enter Number of offer products to 1
Under the Offer Products tab, pick Select offer products type to Same as the purchased products.
That’s all.
Example 11: Buy two Large Pizza, get one Small pizza free.
Note: Large and Small represent the OC options
Create a new combination
In the Product Combination tab, click the Add Category button and choose the category Pizza and Enter The number of purchases required of a productto 1
In the Product Combination tab, click the Add Category button and choose the category Pizza and Enter The number of purchases required of a productto 1
In the Product Combination tab, click the Add Option button and choose the options Large and Enter The number of purchases required of a productto 0
Under the Offer Products tab, enter Number of offer products to 1
Under the Offer Products tab, pick the Select offer products type to Same as the purchased products.
Under the the Offer Products tab, select the Discount on option price to Discount on some option price. Then choose the option Small
Note: Step 2 and Step 3 ensures the number of purchase required is two and it could be any two items from the category Pizza. The step-3 will make sure that the product must have the option `Large. We don't need to provide any quantity here. The module automatically would make sure the corresponding options were chosen if it sees the quantity for the option rule as 0.
7. On the Payment success condition field, enter the following condition:
LMI_PAYMENT_NO != ''
Complete Integration example of webmoney in X-payment
8. Please download this ocmod and install it through the extension installer and refresh your ocmod list. This is needed as WebMoney does not return to the success page properly.
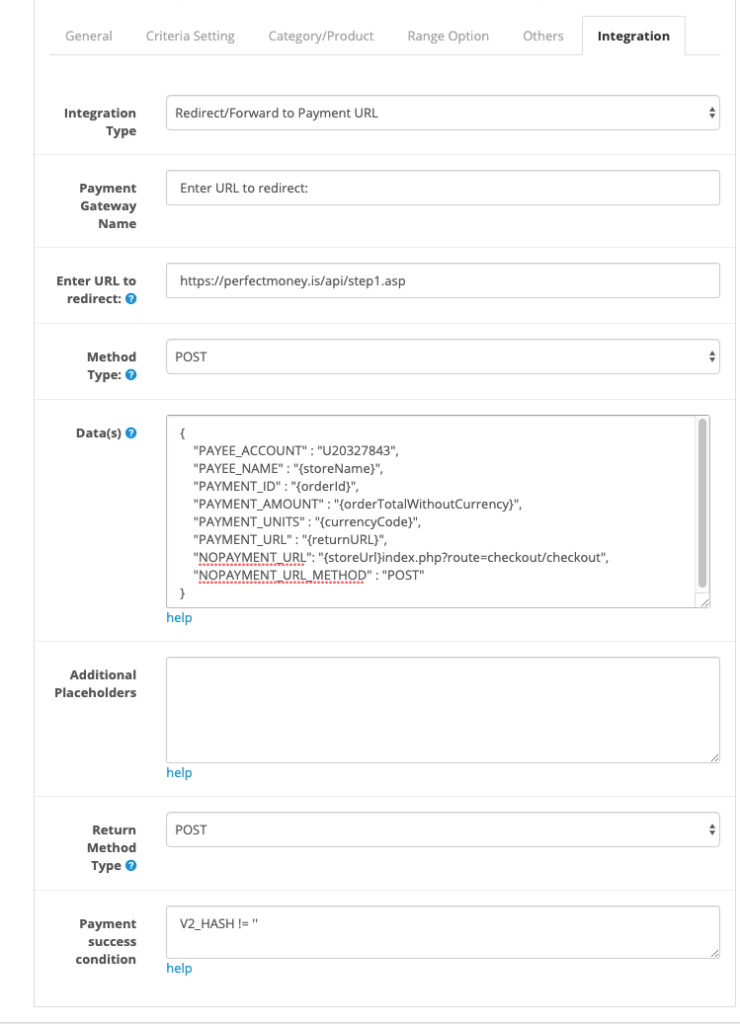
You can integrate Perfect money in xpayment in following ways:
Create a new payment method in x-payment
On the General setting, Choose your Order status that you want to apply when the purchase is successful.
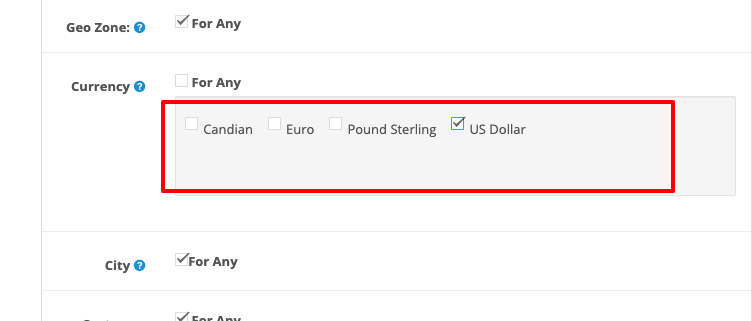
On the Criteria setting Tab, uncheck the checkbox “For any” of the option Currency Rule. Now choose your applicable currency. This is needed as Perfect Money is not available to all currencies.
4. On the integration tab, Select Integration Type “Redirect/Forward to Payment URL”
5. Enter URL to redirect is: https://perfectmoney.is/api/step1.asp
6. Select Method Type: POST
7. On the Data(s) field, enter following JSON data and adjust your PAYEE_ACCOUNT accordingly.
initial charge(Rate per parcel) $10
Plus rate per 100g or part thereof $1
So if customer buy an item of 300g
Total charge is $13 (1 x $10 + 3 x $1)
Thanks for your query. Please do following:
1. Under Price setting tab, Select Rate type is Weight.
I am assuming that your default weight unit is gram. If it is KG, then you will have to enter it accordingly. For example, 100 will be replaced with 0.1
Now enter following Unit Ranges:
Start . —- End . —- Cost —- per unit block —- Allow partial
0 —- 999999 — 1 —– 100 – – — – – NO
Explanation:
——-
a. First define a big ranges 0 – 999999 so that it covers all weight
b. Per unit block ensure that it will charge $1 per 100 gram
c. Allow partial ensure that it will not charge partial block. SO it will charge $3 for 250 grams instead of $2.5
2. Under Price adjustment section, enter +10 into the field “Modifier” [+10 means it will add $10 with final cost]
If shopping cart include any product in category A, a discount is based on percentage of all Category A products.
For example:
Category A include Product I of $10, product II of $5.
Category B include product III of $30
If shopping cart include
2 Product I (category A): 2*10
1 Product III (category B): 1*30
Then discount= percentage of 2*10
Could you explain to me how to setup this rule?
Thanks for contacting and using xfeepro.
Configuring conditional logic is bit complex. But this can be achieved by Group mode option. Group mode option can be found under general setting tab. Fee having same Sort order value will consider as a group. Sort order field can be found under general tab of each method.
For conditional mode, you will have to choose Group mode is AND. Now if you create two methods and assign same sort order value, those two methods will act as a group and one method won’t be appeared unless other method become valid. Noted that in group mode AND, price will be calculated from first fee, remain fees will be used just for other condition validation.
Lets start configuration:
First, under General Setting tab, Select Group mode is AND
Since you need to calculate cost based on category A, so we will create that fee first and then will create the other fee that will be just used for validating category condition.
First fee for category A
———–
1. Create a new fee and enter a name
2. Under General tab, enter sort order value is 1 [Or whatever but need to be entered same value into the the fee so grouping can work]
3. Under Product/Category Tab, select Category Rule is “Any of the selected categories with other”. Then choose your applicable categories for which you want to offer discount. In your case these are Category A
4. Under Price setting tab, Select Rate type is Flat and enter your discount percentile into fee cost. For example: 5%
5. Now in the same tab, Select “Percentage related to” is “Sub-total Fee specific” . [Sub-total Fee specific ensure that xfeepro would consider the products of chosen categories only]
First fee for category B
———–
1. Create a new fee and enter a name
2. Under General tab, enter sort order value is 1 [This must be same as previous one]
3. Under Product/Category Tab, select Category Rule is “Any of the selected categories with other”. Then choose your conditional categories In your case these are Category B
Keep other setting as their default. Since this will be used just for category conditioning thing.
You have a payment gateway, that needs to send some datas (like total amount, API key etc) to their server and payment gateway will do all necessary things on their server and return back to your store once processing is done with payment data.
How to implement?
Since it needs to redirect to payment gateway with some datas. So first select Integration type is “Redirect/Forward to Payment URL”
Now enter the payment gateway URL where it need to be redirected/forwarded.
Now you will have to enter all data as JSON format into Data(s) section. You can use few placeholders like {orderTotal}, {currency} etc that xpayment will handle accordingly. Xpayment also has a special placeholder {returnURL} that basically a special URL so that you can return to store from payment gateway. Most of the payment gateway, it need to supply return URL into data section OR it can be set on payment gateway control panel. Return URL denotes basically http://YOUR_DOMAIN/index.php?route=extension/payment/xpayment/confirm
Now select return method type that means how your payment gateway will reply back to store. It could be GET or POST or JOSN. Normally it can be found in payment gateway manual.
Finally, you will have to enter a payment successful condition. That means after returning back from Payment gateway to your store, it can be successful or failure transaction. Normally, it can be found in payment gateway manual. Most of the cases, they send some data like success==true or something like that where success is variable name that will available in their response.
Now xpayment will do remaining things what to do. Either it will reject or accept depending on the data.
Scenario -2
You have a payment gateway, that needs to call their provided API URL/endpoint from your store without leaving your store. it may need to provide some data while calling that API URL.
How to implement?
1. Since it needs to call API with some datas. So first select Integration type is “API Call”
2. Now enter the payment gateway API URL that need to be called.
3. Now you will have to enter all data as JSON format into Data(s) section.
4. Now select API response type. It could be GET or POST or JOSN.
5. Finally, you will have to enter a payment successful condition.
Actually it needs some developing knowledge to integrate payment gateway.