Category Archives: Trick & Tips

Displaying a form created with x-form via Design -> Layout

Unfortunately, it is not possible to add the form directly from the Design -> layout.

But here is a workaround:

1. First, copy the iframe code of a form from the form Setting -> Shorcode/Url tab

2. Now add an `HTML Content` module from Extension -> Modules -> Html Content

3. Please click the `Code View` icon to switch into `Code mode` and paste the copied iframe code

4. Now You can add this module from Design -> Layout

Cookie Consent By X-Notice

Here are the steps:

  1. X-Notice -> Global Setting -> Integration, On the field `Custom CSS`, enter following CSS:
.cookie-consent {
    background-color: #f2f2f2;
    color: #111;
    padding: 0px 15px 5px 15px;
    bottom: 10px;
    position: fixed;
    z-index: 10000;
    margin: 0 15px;
    border-radius: 5px;
   border: 1px solid #ddd;
}
button.xnotice-close {
    display: block;
    float: right;
    margin-top: 5px;
    background: #21ab0a;
    border: 1px solid #21ab0a;
    padding: 4px 15px;
    color: #fff;
    border-radius: 3px;
}

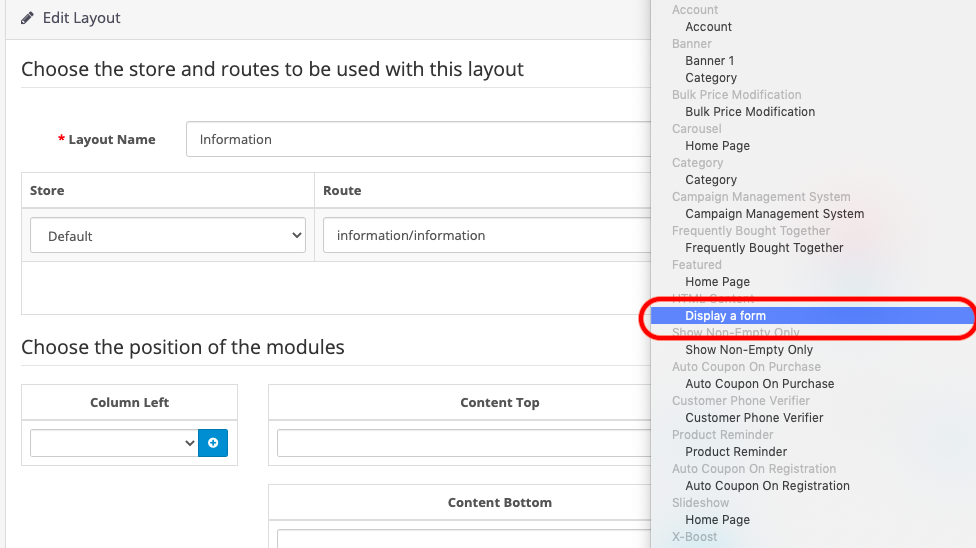
2. Now Create a new notice and enter the consent text. For example:

<h3>We use cookies</h3>
We use cookies and other tracking technologies to improve your browsing experience on our website, to show you personalized content and targeted ads, to analyze our website traffic, and to understand where our visitors are coming from.

<div class="consent-btns">
<button class="xnotice-dissent" onclick="consentClose()">I do not accept</button><button class="xnotice-close">I accept</button>
</div>

3. Under the `Notice Setting tab, Select the `Display Type to `Sticky`

4. Tick the checkbox `Don’t show once closed`

5. Pick the `Token Storage Type to `Cookie`

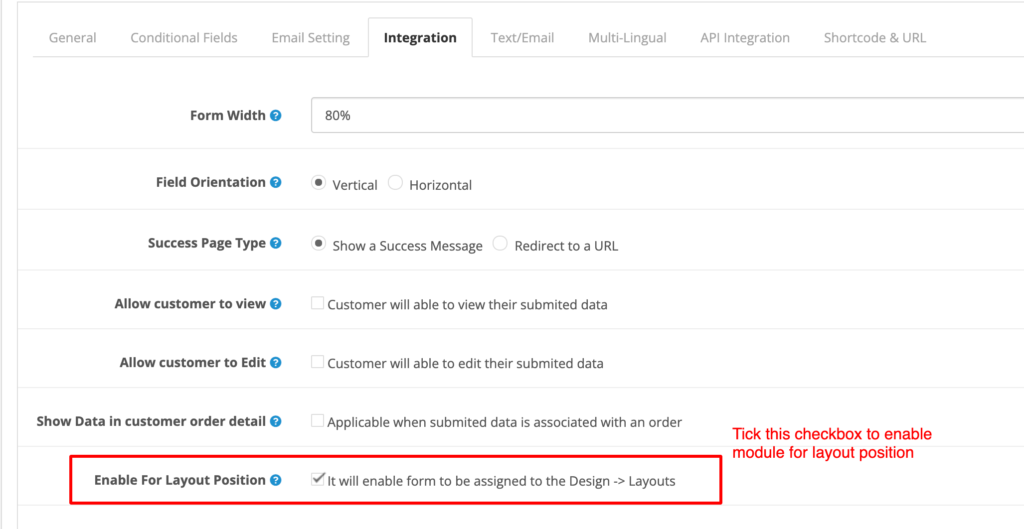
6. On the Custom Layout Field, enter following custom layout

<div {attr}  class="cookie-consent">{notice}</div>

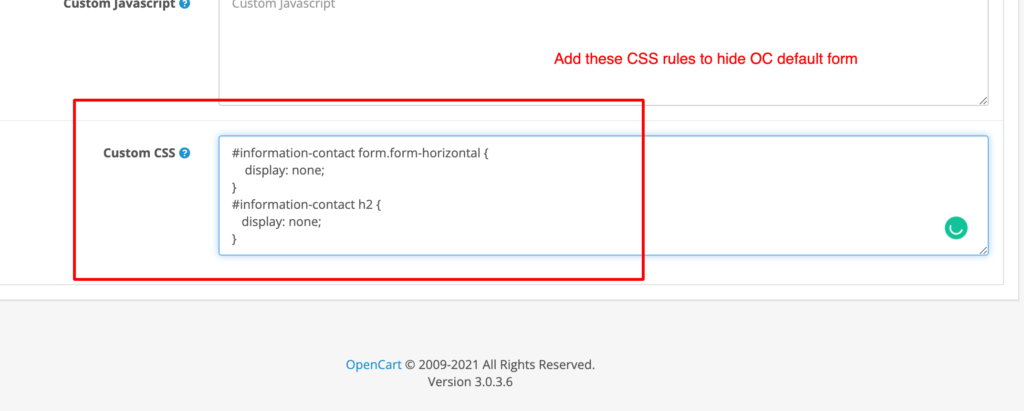
7. On the `Custom Javascript` field, enter following:

var  consentClose = function() {
       location = "about:blank";                  
 }
window.consentClose = consentClose;

8. Now click `Click and Stay` button and that’s all.

How to overwrite the default contact us form with a form created by xform?

You will have to do the following steps if you want to overwrite the default contact form with a form created by xform.

  • Please navigate to X-Form and click the Cog icon of the form you want to overwrite with.
  • Now navigates to the Integration tab. Tick the checkbox Enable For Layout Position
  • On the Custom CSS section, add the following CSS rules
#information-contact form.form-horizontal {
    display: none;
}
#information-contact h2 {
   display: none;
}
  • Click the Save and Continue button to store the changes.
  • Now navigate to Design -> Layout, Now edit Contact Layout. Finally, add the Form under the X-Form to the Content Bottom position.

That’s all.

How to sum the cost up of the two methods?

To sum up the cost of several methods, you can use the Grouping Option. Here are the steps to be followed:

  1. Go to X-Shippingpro -> Global setting -> Grouping, Now select a group e.g. Group1 to SUM

2. Now we have a group1 and we have to assign group method/member for this group.

3. To assign a method into a group, go to the general tab of a method, select the Group to Group1.

4. When X-Shippingpro finds several methods belongs to the same group during checkout,  X-Shippingpro takes the appropriate action and shows one method instead of showing them all.

For example, you have a `Method-1` and `Method-2` methods.  If customer want to purchase only from the `Method-2` or `Method-2`, group mode will not come into action. 

But when a customer wants to purchase from both `Method-1` and `Method-2`, it meets the group criteria and grouping will come into action. So shipping cost will be summed up and it displays the summed cost instead of showing separately.

Creating Complex Discount using X-Feepro Equation

Buy two and get third one free.

  • In the price-setting tab, Select the Fee/Discount By to Quantity
  • Now add a quantity range as like the screenshot

  • On the Final Equation field, please enter one of the following equations

If you want to apply the discount to the least expensive product,

-{priceAscByNoOfBlock}

If you want to apply the discount to the average price of the products,

-({subTotalAsPerProductRule}/{quantityAsPerProductRule}) * {noOfBlock}

If you want to apply a discount equal to the lowest product price,

-{lowest} * {noOfBlock}

That’s all

Buy two at a fixed cost of $100

  • In the price-setting tab, Select the Fee/Discount By to Quantity
  • Now add a quantity range as follows as like the screenshot
  • On the Final Equation field, please enter the following equation

{noOfBlock} * 100 – {blockPriceAsc}

That’s all

10% Discount on all products when purchase quantity > 2

  • In the price-setting tab, Select the Fee/Discount By to Flat Amount
  • On the Final Equation field, please enter the following equation

@{anyProductQuantity} >= 2 ? -{anyProductPrice} * {anyProductQuantity} * 0.1 : 0

That’s all

(P.S: if you find any problem, please replace the dash with a minus sign in the equation as HTML replaces the minus sign to a dash that may cause a problem)

How to integrate Web Money in X-Payment

You can integrate Web money in xpayment in following ways:

  1. Create a new payment method in x-payment
  2. On the General setting, Choose your Order status that you want to apply when the purchase is successful.
  3. On the integration tab, Select Integration Type “Redirect/Forward to Payment URL
  4. Enter URL to redirect is: https://merchant.wmtransfer.com/lmi/payment_utf.asp
  5. Select Method Type: POST
  6. On the Data(s) field, enter following JSON data and adjust your LMI_PAYEE_PURSE accordingly.
{
    "LMI_PAYEE_PURSE" : "ADD_YOUR_PAYEE_PURSE",
    "LMI_PAYMENT_DESC" : "Payment to {storeName}",
    "LMI_PAYMENT_NO" : "{orderId}",
    "LMI_PAYMER_EMAIL": "{email}",
    "LMI_PAYMENT_AMOUNT" : "{orderTotal}",
    "LMI_SUCCESS_URL" : "{returnURL}",
    "LMI_FAIL_URL": "{storeUrl}index.php?route=checkout/checkout",
    "LMI_SUCCESS_METHOD" : "POST"
}

7. On the Payment success condition field, enter the following condition:

LMI_PAYMENT_NO != ''
Complete Integration example of webmoney in X-payment

8. Please download this ocmod and install it through the extension installer and refresh your ocmod list. This is needed as WebMoney does not return to the success page properly.

How to integrate Perfect money in X-Payment

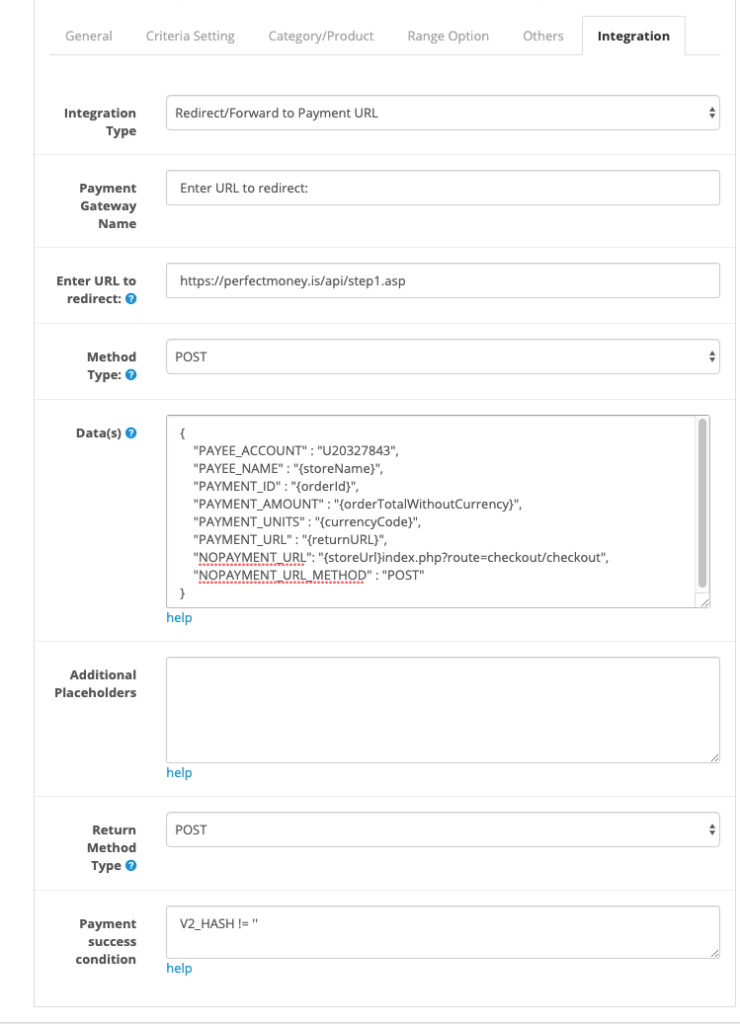
You can integrate Perfect money in xpayment in following ways:

  1. Create a new payment method in x-payment
  2. On the General setting, Choose your Order status that you want to apply when the purchase is successful.
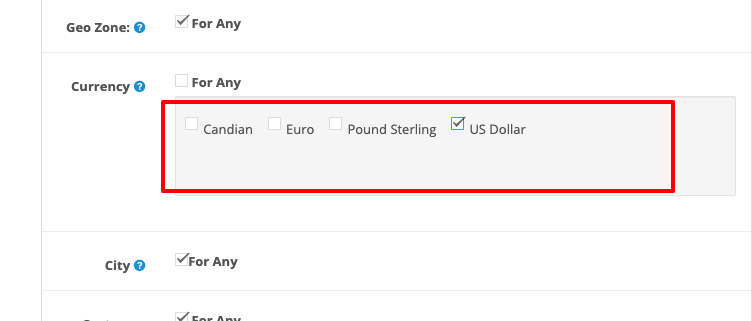
  3. On the Criteria setting Tab, uncheck the checkbox “For any” of the option Currency Rule. Now choose your applicable currency. This is needed as Perfect Money is not available to all currencies.

4. On the integration tab, Select Integration Type “Redirect/Forward to Payment URL

5. Enter URL to redirect is: https://perfectmoney.is/api/step1.asp

6. Select Method Type: POST

7. On the Data(s) field, enter following JSON data and adjust your PAYEE_ACCOUNT accordingly.

{
    "PAYEE_ACCOUNT" : "U17290487",
     "PAYEE_NAME" : "{storeName}",
    "PAYMENT_ID" : "{orderId}",
    "PAYMENT_AMOUNT" : "{orderTotal}",
    "PAYMENT_UNITS" : "{currencyCode}",
    "PAYMENT_URL" : "{returnURL}",
    "NOPAYMENT_URL": "{storeUrl}index.php?route=checkout/checkout",
    "PAYMENT_URL_METHOD" : "POST",
    "NOPAYMENT_URL_METHOD" : "LINK"
}

8. On the Payment success condition field, enter the following condition:

PAYMENT_ID != ''
Full Integration Example of perfect money in X-Payment

How to customize the theme of Ribbon and Countdown in X-Discount

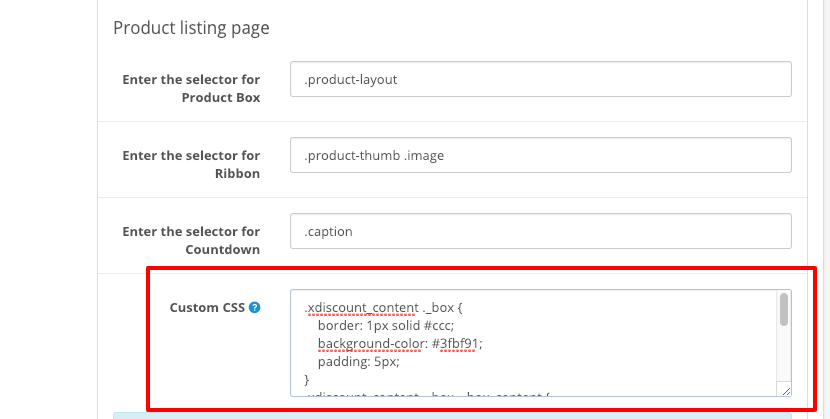
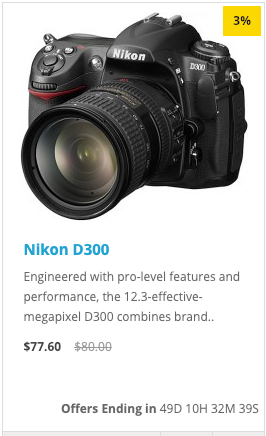
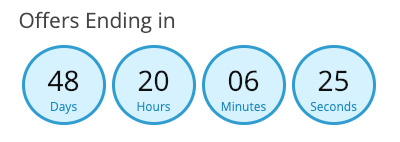
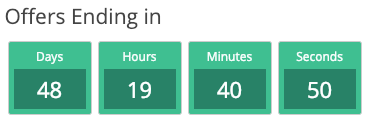
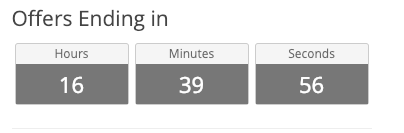
It is possible to change the theme colour of the ribbon and countdown in X-Discount. To change your theme, you will have to put your custom CSS rules to the field Custom CSS located in the Global Setting tab of the X-Discount.

Custom CSS in X-Discount

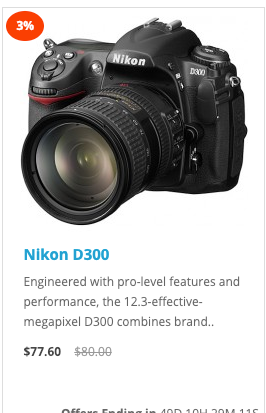
Here are examples of the custom ribbon and countdown:

Example 1: Red Round Ribbon

Required CSS rules

.xdiscount_ribbon {
     background: #fc3f00;
     font-weight: bold;
     border-radius: 50%;
 }
 .xdiscount_ribbon:before {
     display:none;
 }

Example 2: Yellow Ribbon in right side

Required CSS rules

.xdiscount_ribbon_container {
     right: 3px;
     left: auto;
 }
 .xdiscount_ribbon {
     background: #fcd800;
     color: #111;
     font-weight: bold;
 }
 .xdiscount_ribbon:before {
     display:none;
 }

Example 3: Countdown white background

Required CSS rules

.xdiscount_content ._box {
     border: 1px solid #319cd1;
     background-color: #f5f5f5;
     position: relative;
 }
 .xdiscount_content ._box ._box_label {
     position: absolute;
     bottom: 2px;
     width: 100%;
 }
 .xdiscount_content ._box ._box_content {
     padding: 15px 0 25px 0;
     background-color: #fff;
     color: #3098cc;
 }

Example 4: Black Countdown

Required CSS rules

.xdiscount_content ._box {
     border: none;
     background-color: transparent;
 }
 .xdiscount_content ._box ._box_content {
     padding: 15px 0;
     background-color: #020202;
     box-shadow: 0 0 5px 0px rgba(0,0,0,0.5);
 }

Example 5: Gradient Countdown

Required CSS rules

.xdiscount_content ._box {
     border: 1px solid #7bc2ec;
     background-color: #f5f5f5;
 }
 .xdiscount_content ._box ._box_content {
     font-size: 22px;
     padding: 14px 0px;
     background: linear-gradient(0deg, #3f6a7f, #84d6ff);
     color: #fff;
     box-shadow: 0px 0px 5px 0px rgb(77, 171, 228);
 }
 .xdiscount_content ._box ._box_label {
     background: #e4f6ff;
     border-bottom: 1px solid #7bc2ec;
 }

Example 6: Round Countdown

Required CSS rules

.xdiscount_content ._box {
     border: none;
     background-color: transparent;
     position: relative;
 }
 .xdiscount_content ._box ._box_content {
     padding: 22px 0;
     background-color: #d7f2ff;
     color: #101010;
     border-radius: 50%;
     height: 80px;
     font-size: 28px;
     border: 3px solid #319cd0;
 }
 .xdiscount_content ._box ._box_label {
     position: absolute;
     bottom: 8px;
     width: 100%;
     color: #1c84b7;
 }

Example 7: Green Countdown

Required CSS rules

.xdiscount_content ._box {
    border: 1px solid #ccc;
    background-color: #3fbf91;
    padding: 5px;
}
.xdiscount_content ._box ._box_content {
    background-color: #288267;
    color: #fff;
}
.xdiscount_content ._box ._box_label {
    color: #fdfdfd;
    padding: 0px 0px 2px 0px;
}

Example 7: Without Hour Box

Countdown without hour box

Required CSS rules

.xdiscount_content ._days {
    display: none;
}
.xdiscount_content ._box {
    flex-basis: 33%;
}

How to select css selector for discount ribbon and offer countdown in X-Discount

As you know opencart has many themes on the marketplace and it is quite impossible to add predefined patches to all available templates. By X-Discount’s offer countdown and discount, the ribbon has been configured for the default theme. But it is possible to show countdown and ribbon on any theme. The Ribbon & Countdown Setting tab of the X-Discount module allows you to defined your own CSS selector where the ribbon or countdown will have appeared.

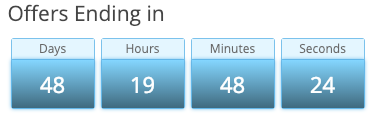
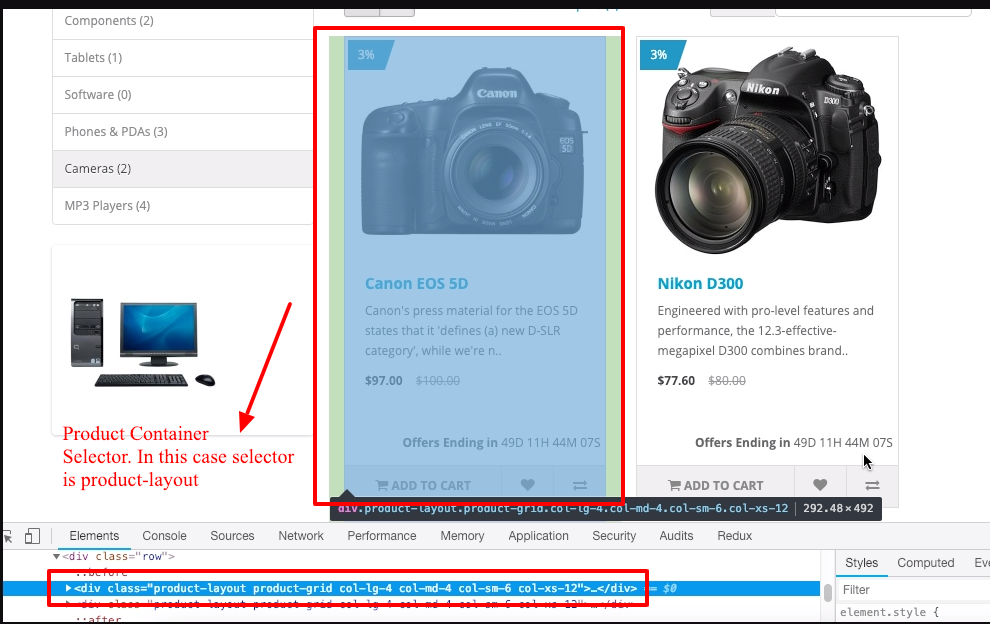
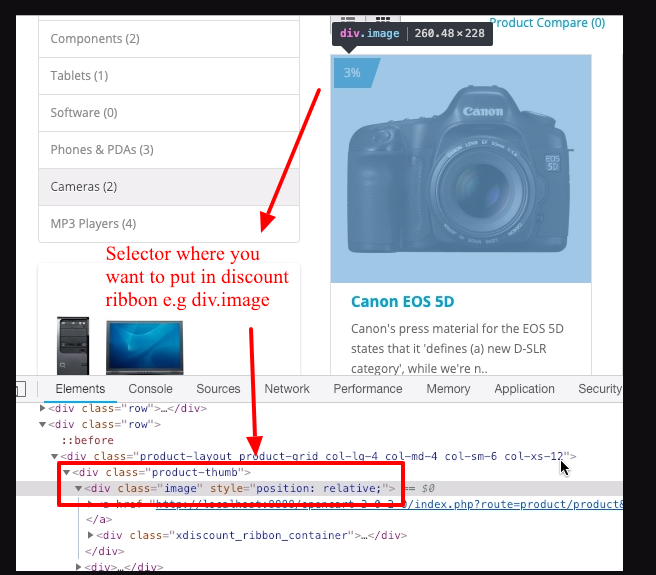
Let me show you how to find the selector using the chrome debugging tool. Let’s assume you want to place a ribbon on the product listing page. To do so, please navigate to any product listing page. Then click the mouse right button over any product box and then click the Inspect option. It will show up chrome debugging tool. Now find out a CSS Class that must be unique so it can be used to differentiate product boxes across the page. For example, for the default theme CSS selector .product-layout is unique.

Selector for the Product Box in default theme

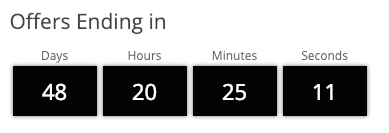
Once you choose the selector for the product box, you will have to find out a selector where the X-discount actually put the ribbon in. For example, in the default theme, it could be .product-thumb .image

Selector for ribbon in the listing page

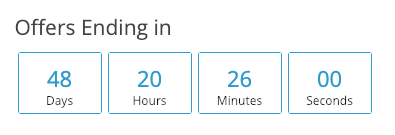
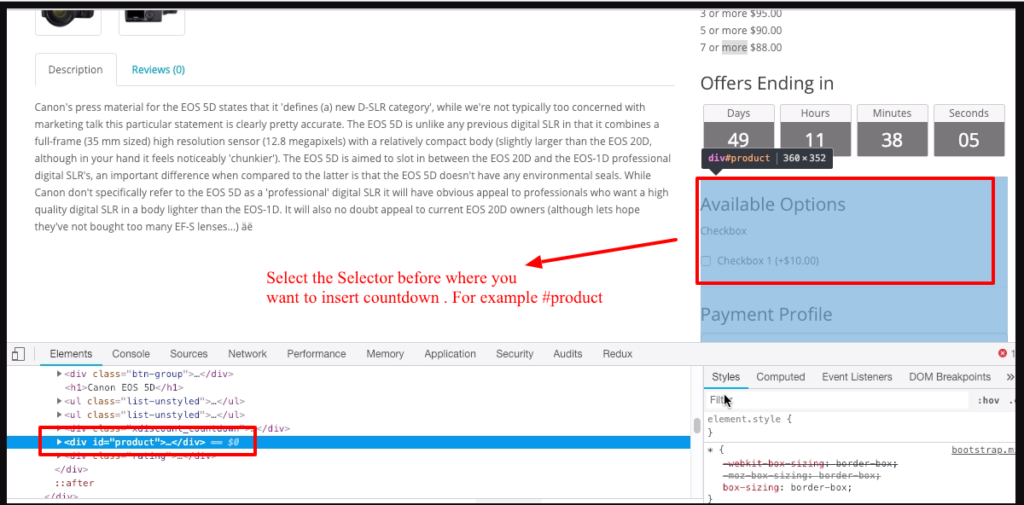
Similarly, you can get your selector for the details. Note in the detail page, the countdown would be placed before the given selector. For example, in the default theme, the selector #product could be a good choice.

Countdown in the product detail page

However, if you have any problem getting your selector, don’t hesitate to request support. Have a good day!