Author Archives: samir

How to integrate Perfect money in X-Payment

You can integrate Perfect money in xpayment in following ways:

  1. Create a new payment method in x-payment
  2. On the General setting, Choose your Order status that you want to apply when the purchase is successful.
  3. On the Criteria setting Tab, uncheck the checkbox “For any” of the option Currency Rule. Now choose your applicable currency. This is needed as Perfect Money is not available to all currencies.

4. On the integration tab, Select Integration Type “Redirect/Forward to Payment URL

5. Enter URL to redirect is: https://perfectmoney.is/api/step1.asp

6. Select Method Type: POST

7. On the Data(s) field, enter following JSON data and adjust your PAYEE_ACCOUNT accordingly.

{
    "PAYEE_ACCOUNT" : "U17290487",
     "PAYEE_NAME" : "{storeName}",
    "PAYMENT_ID" : "{orderId}",
    "PAYMENT_AMOUNT" : "{orderTotal}",
    "PAYMENT_UNITS" : "{currencyCode}",
    "PAYMENT_URL" : "{returnURL}",
    "NOPAYMENT_URL": "{storeUrl}index.php?route=checkout/checkout",
    "PAYMENT_URL_METHOD" : "POST",
    "NOPAYMENT_URL_METHOD" : "LINK"
}

8. On the Payment success condition field, enter the following condition:

PAYMENT_ID != ''
Full Integration Example of perfect money in X-Payment

How to customize the theme of Ribbon and Countdown in X-Discount

It is possible to change the theme colour of the ribbon and countdown in X-Discount. To change your theme, you will have to put your custom CSS rules to the field Custom CSS located in the Global Setting tab of the X-Discount.

Custom CSS in X-Discount

Here are examples of the custom ribbon and countdown:

Example 1: Red Round Ribbon

Required CSS rules

.xdiscount_ribbon {
     background: #fc3f00;
     font-weight: bold;
     border-radius: 50%;
 }
 .xdiscount_ribbon:before {
     display:none;
 }

Example 2: Yellow Ribbon in right side

Required CSS rules

.xdiscount_ribbon_container {
     right: 3px;
     left: auto;
 }
 .xdiscount_ribbon {
     background: #fcd800;
     color: #111;
     font-weight: bold;
 }
 .xdiscount_ribbon:before {
     display:none;
 }

Example 3: Countdown white background

Required CSS rules

.xdiscount_content ._box {
     border: 1px solid #319cd1;
     background-color: #f5f5f5;
     position: relative;
 }
 .xdiscount_content ._box ._box_label {
     position: absolute;
     bottom: 2px;
     width: 100%;
 }
 .xdiscount_content ._box ._box_content {
     padding: 15px 0 25px 0;
     background-color: #fff;
     color: #3098cc;
 }

Example 4: Black Countdown

Required CSS rules

.xdiscount_content ._box {
     border: none;
     background-color: transparent;
 }
 .xdiscount_content ._box ._box_content {
     padding: 15px 0;
     background-color: #020202;
     box-shadow: 0 0 5px 0px rgba(0,0,0,0.5);
 }

Example 5: Gradient Countdown

Required CSS rules

.xdiscount_content ._box {
     border: 1px solid #7bc2ec;
     background-color: #f5f5f5;
 }
 .xdiscount_content ._box ._box_content {
     font-size: 22px;
     padding: 14px 0px;
     background: linear-gradient(0deg, #3f6a7f, #84d6ff);
     color: #fff;
     box-shadow: 0px 0px 5px 0px rgb(77, 171, 228);
 }
 .xdiscount_content ._box ._box_label {
     background: #e4f6ff;
     border-bottom: 1px solid #7bc2ec;
 }

Example 6: Round Countdown

Required CSS rules

.xdiscount_content ._box {
     border: none;
     background-color: transparent;
     position: relative;
 }
 .xdiscount_content ._box ._box_content {
     padding: 22px 0;
     background-color: #d7f2ff;
     color: #101010;
     border-radius: 50%;
     height: 80px;
     font-size: 28px;
     border: 3px solid #319cd0;
 }
 .xdiscount_content ._box ._box_label {
     position: absolute;
     bottom: 8px;
     width: 100%;
     color: #1c84b7;
 }

Example 7: Green Countdown

Required CSS rules

.xdiscount_content ._box {
    border: 1px solid #ccc;
    background-color: #3fbf91;
    padding: 5px;
}
.xdiscount_content ._box ._box_content {
    background-color: #288267;
    color: #fff;
}
.xdiscount_content ._box ._box_label {
    color: #fdfdfd;
    padding: 0px 0px 2px 0px;
}

Example 7: Without Hour Box

Countdown without hour box

Required CSS rules

.xdiscount_content ._days {
    display: none;
}
.xdiscount_content ._box {
    flex-basis: 33%;
}

How to select css selector for discount ribbon and offer countdown in X-Discount

As you know opencart has many themes on the marketplace and it is quite impossible to add predefined patches to all available templates. By X-Discount’s offer countdown and discount, the ribbon has been configured for the default theme. But it is possible to show countdown and ribbon on any theme. The Ribbon & Countdown Setting tab of the X-Discount module allows you to defined your own CSS selector where the ribbon or countdown will have appeared.

Let me show you how to find the selector using the chrome debugging tool. Let’s assume you want to place a ribbon on the product listing page. To do so, please navigate to any product listing page. Then click the mouse right button over any product box and then click the Inspect option. It will show up chrome debugging tool. Now find out a CSS Class that must be unique so it can be used to differentiate product boxes across the page. For example, for the default theme CSS selector .product-layout is unique.

Selector for the Product Box in default theme

Once you choose the selector for the product box, you will have to find out a selector where the X-discount actually put the ribbon in. For example, in the default theme, it could be .product-thumb .image

Selector for ribbon in the listing page

Similarly, you can get your selector for the details. Note in the detail page, the countdown would be placed before the given selector. For example, in the default theme, the selector #product could be a good choice.

Countdown in the product detail page

However, if you have any problem getting your selector, don’t hesitate to request support. Have a good day!

How does Cumulative Price work in XShippingpro?

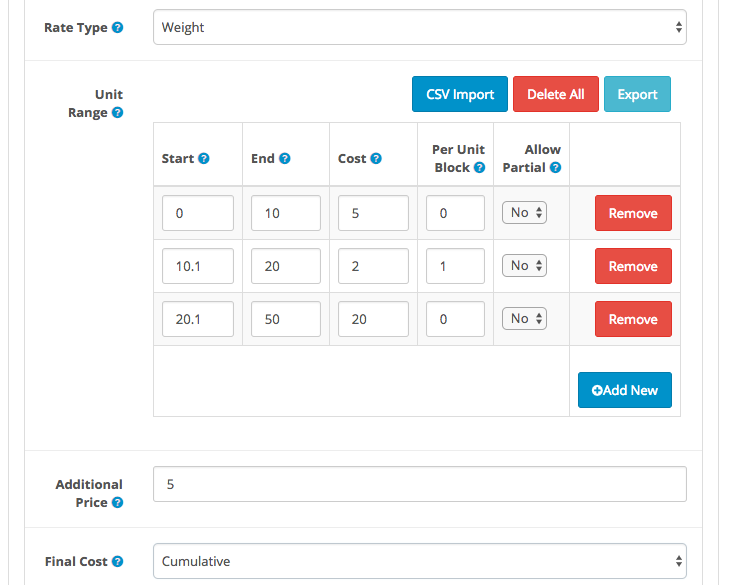
If you set final cost to Cumulative,  xshippingpro will sup up cost of all unit rows and even applicable Additional Price. Let look into following setting:

Before continue into further lets discuss two things.

How doesXshippingpro calculate Per Unit Cost?
If you noticed, I have entered Per Unit Block is 1 for the second unit row.  Since cost is defined $2 to that row. So each block cost would be $2. Lets calculate how may blocks out there.
Start: 10.1
End: 20
So Total blocks:  (End – Start) / Per Unit Block = (20 -10.1) / 1 = 9.9 i.e Round value: 10
( One thing is worth to inform that Xshippingpro would not round if you would have set Allow Partial is Yes )
Therefore, Total Cost: 10  x $2 = $20
How does Xshippingpro calculate Additional Price?
If xshippingpro find a match among the unit ranges, it will not move forward to Additional Price. But if there no proper matching is found, xshippingpro will move ahead to Additional Price rule and try to calculate shipping cost depending on its value.
By default, xshippingpro calculate additional cost per 1 Unit e.g 1 KG in this case (or whatever Rate Type you defined. If you define Rate type is Quantity, then Per 1 Item) basis unless you define Per Unit Block in the last unit row.
For example, there is no Per Unit Block  defined to the last unit range row. So additional price will be calculated for per 1 KG since Rate type is Weight. Lets say Additional Price is $10, that means cost for every KG is $10
If there was Per Unit block defined to the last unit range row, it would calculate additional price per Per Unit block basis. For example, if it was defined 2, additional price would calculate per 2 KG.  Lets say Additional Price is $10, that means cost for every 2KG is $10

Let’s proceed to main discussion. Lets say we have cart weight 60KG so what would the final shipping cost according to above setting?

1.  First row:  $5
2.  Second row:  $20      (No of blocks: 10 and Cost per block: $2 ,Therefore, 10 x $2 = $20 )
3.  Third row:  $20
Yes, we have still some weight 10KG pending to be calculated  even after all unit rows are done. Because our last row’s upper limit is 50KG but our cart weight is 60KG
4. Additional Shipping Cost: $50   ( Additional Price $5 and we have 10KG to be calculated per 1 KG basis)
Since Final Price cumulative so lets sum up item 1 to 4: ( $5 +$20 + $20 + $50) = $95
Therefore, Final shipping cost for 50KG weight would be $95

Xform field validation using regular expression

xform regular expression for validation

Title Expression Example
US phone validation      /^\(?(\d{3})\)?[-\. ]?(\d{3})[-\. ]?(\d{4})$/ 555-555-1212, (555)-555-1212), 555 555 1212, 555.555.1212, (555).555.1212
UK Phone Validation  /^(\+44\s?7\d{3}|\(?\d{5}\)?)\s?\d{3}\s?\d{3}$/ 07222 555555, (07222) 555555, +44 7222 555 555
ZIP code validation    /^[0-9]{10}$/  
UK postal validation    /[A-Z]{1,2}[0-9][0-9A-Z]?\s?[0-9][A-Z]{2}/i  
Image Validation   /jpeg|png|gif|jpg/  jpg, png and gif
Image Validation with mime type   /image\/jpeg|image\/png|image\/gif|image\/jpg/  jpg, png and gif
PDF file validation  /application\/pdf|application\/x-pdf/  
Alphabet String Length   /^[a-zA-Z]{3,7}$/   Min length 3 and max length is 7
Any String Length   /^.{5,20}$/   Min length 5 and max length is 20
Restrict/Block HTML   /^(?!.*((<.*?>.*?<\/\w+>)|(:\/\/)))/  

How to remove twig cache in OC 3.x

There is a tiny developer menu in opencart 3.x that can be overlooked easily but it is very essential for every developer or store owner. All we know that since OC 3.x, it uses twig as template engine and we often need to remove twig cache. We can remove twig cache by removing files in storage/cache directory using ftp. Interesting that it is possible to remove template cache from developer menu that can be found admin dashboard easily. Here are the steps:

  1. First check you have enough permission to modify developer menu by editing User group.

2. Developer menu can be found in admin dashboard

3. It will open a popup whenever you click on developer menu. Now you can refresh/remove twig cache by clicking on Refresh icon. Also it is possible to remove SASS cache from that popup.

Video tutorials on Xshippingpro

I don’t know Lee Ashby personally but I would like to give a big thanks for making few wonderful videos on X-shippingpro in his youtube channel. Lee Ashby, I owe you a cup of coffee! Thank you buddy!

Here are the video links:

X-shipping Pro Opencart Shipping Tutorial – Basic Flat Rate

X-shipping Pro Opencart Shipping Tutorial – Free Shipping

X-shipping Pro Opencart Shipping Tutorial – Groups & Geo Location

X-Shipping Pro Opencart Shipping Tutorial – Heavy Item Surcharge


First level grouping vs Second level grouping in xshippingpro

In xshippingpro, there are two levels of grouping:

  1. Group in methods – First level grouping is based on Group Field  and
  2. Group in groups – second level grouping is based on Sort Order field.

Xshippingpro first calculate grouping based on Group field and finally it calculate grouping again based on Sort Order Fields.

Second level grouping need very seldom. Most of the cases, first/top level grouping is enough to achieve the scenario. However, it might be needed second level grouping in few cases.
Why do you need grouping basically? Sometimes we came across in a situation when we have to take decision what to do to a special case. For example, You want to charge shipping cost $5 if any item is chosen from category A and shipping cost $10 when any item is chosen from Category B. But what would happen when someone want to purchase from both category A and B? Well, you may want sum the shipping cost up Or want to move on with highest Shipping cost.

You can then let xshippingpro know your decision through grouping mode. For doing so, you will have to navigate to group mode option, then Choose Group1 is Sum or whatever you want. Now, You will have to assign this group to each of the applicable shipping method in the General tab. Under general tab of the method, you will find an option “Group”. This is field where you need to be assigned it. If you don’t need any group, you can just keep it as “None”.

This way, you can make up to 10 groupings amongst the shipping methods. One method can belong to only one group at a time.

Now let discuss Group of groups or second level grouping. For example, you have 5 top level groups like I discussed above. Now you have come up in a situation where you may need to sum up the cost of  the groups. This is very rare case but it may be needed. Thats why Group of Group is only one. To make grouping within groups, you first choose Group mode i.e either it is sum or highest etc.

Then you will have to choose shipping methods for this group. Unfortunately, there is no selection field for this kind of grouping like first level grouping. Xshippingpro consider value of the Sort Order field that is located under general tab to find out or calculate such grouping. Method having same Sort order value will be considered as a group. For example,  if you have chosen “Group of groups” is Sum. Now method-A and method-B has sort order value is 1. Now xshippignpro, will consider these two method as a group. So whenever both methods shall become activate simultaneously, xshippignpro will show one method instead of both depending on Group mode (sum, average etc).

Note group in groups will not work unless you have at least one first/Top level grouping.